How to see all posts

A number of people have found it difficult to see the whole blog. At the bottom of each page, there is a "newer post" and an "older post" link. just click on these to see more posts. There is also a list of pages by month in the left sidebar.

Saturday, April 30, 2016

Second floor stairs and extension progress


I have finished the second floor stairs. There is another set that goes up from the little landing to the third floor, but as on the ground floor, I'm not going to install those yet, since I will be moving this house in a few weeks, and will be moving it one floor at a time, rather than trying to move the whole house at once.

I still need to add more rocks to the second shoe stone. When that is completed, it will go in front of the door on the right.


I finished the right side extension. Next I will be adding a shingled overhang over both extensions. This will take a little longer than the ones on the ground floor, because it goes over both porches, turns the corner, and goes over the middle as well.

Thursday, April 28, 2016

Dragon Room Shoji


I finished the shoji for the dragon extension. These shojis have a window cut into them, and I like it!

A hint for anyone who may build this house in the future, don't permanently install the top sliding window piece until after you install the shojis that slide into the top slot, or you will have a problem fitting them in. Once they are installed you can permanently install it, then put the other two shojis in and add the board that forms the second slot. Also, the instructions say to trim the paper in the window after putting in the tiny window frame. I trimmed my window before putting in the frame, then added the frame after. I think it looks much neater this way.

Right hand extension railing


I have finished the railing for the right hand second floor extension. This was kit #55, which is halfway through all 110 kits that came with this house.

I think they must have wanted to provide a little variety, because this extension was put together in a different order than the last extension. I'm hoping that it won't be more difficult to install the shoji and sliding doors with the railing already on.

I should have moved my jar of stain and water based varnish before I took the picture, but I guess it is a good hint for me to pass on. The stain was a quart of Minwax walnut varnish. I emptied the varnish into a glass jar, and it's much easier to use it that way, rather than having to pry the lid off a varnish can all the time. Since I also bring the varnish with me when I work on the house at my mother's, it lessens the chance of a varnish spill in the truck as well.

The other jar contains water based varnish. The varnish stays fresh better in the jar, I don't have to pry off a can lid each time, and I don't have to worry about spills, or the rim of a can gunking up as I use it. If the lid sticks, I just hold it under the faucet with the hot water running for a minute or two, and it opens easily.

Tuesday, April 26, 2016

Progress on the second extension


I have been making progress on the second extension and porch. This shows how it looks so far with it open. I am amazed at how large this building is. The ryokan is sitting on a 2'x4' sheet of plywood, and if I fold the extensions out completely, it is wider than the plywood! My living room isn't big enough to stand back far enough to get a photo of it fully extended, so I had to fold it in to get the whole thing in one photo.


This is how it looks so far closed. It will look a lot better once I get the windows and framing done on the second extension and porch.

Monday, April 25, 2016

The first porch railing


I finished the railing on the second floor left extension. I think it looks quite nice, and it is giving a much more finished look to that side of the ryokan.

Next, is the extension to the right hand side. The extensions take quite a while to build, but they look so nice when they are done! (I keep telling myself that, as I think about building something almost exactly the same all over again)!

Sunday, April 24, 2016

Sliding windows on the first extension


Tonight I finished the sliding windows and the little deck on the first extension. The little deck will have railings around it which have turned up ends like those in a real ryokan.

The shoji doors are partially open so you can see inside the room.

Sorry the photo is so bad, but it's really dark in here, and I couldn't see what I was taking a picture of.


This is the view through the shoji onto the porch.


This shows the amount of room on the porch. There will be tables and chairs out there.

Saturday, April 23, 2016

Shoji for the first extension, and second floor railing


I have finished and installed the shoji to the porch on the first extension. It looks really nice! I'll show it open when I get the rest of the porch finished.


I also installed the railing around the stairwell on the second floor. The plant I showed a few days ago will go in the corner behind the railing, but I didn't put it in yet. I also put a smaller set of steps in that go from the first floor landing to second floor. Those aren't glued in yet because I am not permanently attaching the floors together yet, but I wanted to test fit them. I will be moving the house up to our gift shop in a few weeks, and it will be easier to move the whole thing one floor at a time. I also want to electrify the house, so this way I will be able to run wires between the floors when I decide on where I will need them.

Thursday, April 21, 2016

Porch on the first extension


Today I put the porch on the first tatami room extension. As I was taking pictures, I remembered that I haven't taken any pictures from the side of the house, so this is a photo of the left hand side as it looks now.


This is how the porch looks with the house closed.


This is how it looks so far, with the house open. It is just resting on the spa extension right now. Neither is hinged yet.

There will be Shoji on the inside, and sliding "glass" windows on the outside.

The next kit contains parts for the second floor staircase, so I won't be able to do anything more on this extension until that is finished.

Wednesday, April 20, 2016

Extension to the first Tatami Room Started


I started the extension to the first tatami room. The decorative window at the top on the left hand side is called a ramma. Below that, will be installed some shoji.

A box like structure, which forms a covered porch will be built on the outside of the left hand side, and will be accessed from the room through the shoji.

The right hand side has sliding "glass" doors from the second floor landing, and will open out onto a very narrow deck.

This whole structure will be on the front of the building and will be hinged to give access to the rooms. There will be a matching one over the dragon room and right hand part of the second floor landing.

The ramma for this one actually is supposed to be on the dragon room, but I was confused and thought I was building the side over the dragon room, and painted the ramma blue on the inside to match that room. Rather than try to cover the blue on the finished ramma without messing up the woven wooden decorations in it, I measured that ramma against this one. They have different shaped openings cut in them, but they are exactly the same size, so I just switched them, and will put this room's ramma in the dragon room instead.

Tuesday, April 19, 2016

Telephone Booth and Accessories


The second floor landing is pretty much completed except for the stairs. I installed the phone booth and the little awning above the fusuma to the dragon room.


This is a closer view of the phone booth. You can just see the phone on the wall inside.


This is a plant that will go inside the landing. I still need to add some more stones to the base, and then shape it. Those leaves took forever to cut out! There is also a little "stone" lantern I made. I tried to paint it so it looked like grey granite. (The shading is much more subtle in person, but the flash on the phone seems to magnify the shading effect). It is actually supposed to go into the third floor landing, but I may eventually add fake moss to it and use it outside. I really like the way it came out!

Saturday, April 16, 2016

Dragon Room Tokonoma and Shoji Window


I finished the shoji window in the second floor landing, and the tokonoma in the dragon room.

It was a little easier to install the tokonoma in this room than the last one. The little cabinet with the sliding door was easier as well, because it was a lot larger than the tiny one in the other room. I used the same chiyogami paper on the sliding doors to the cabinet as I did on the fusuma.

I wish I was brave enough to have made the posts in the tokonomas in both rooms from actual sticks, rather than the supplied dowels, but it's difficult enough to get the ready made ones to fit. I'll just have to figure out how to incorporate some natural things later.

I attached the left hand tatami room to the landing last night. Now I am ready to attach the dragon room to it.

The next step will be to start making the porches that swing out from the building when it is open. Each porch covers one tatami room and half of the center room.

Thursday, April 14, 2016

Fusuma between Dragon Room and Second floor landing


Today I completed the fusuma between the dragon room and the second floor landing. This side faces the landing.


This one faces inside the dragon room. You can also see the little awning over the other fusuma and the shoe stone on the landing floor.

The second floor rooms are supposed to be joined together in the next step, but I am going to make and install the shoji window in the landing room first, because it will be easier to reach that way, since it is in the back, and I am working in a small space.

I will also install the tokonoma in the dragon room before joining that room, in case it is as difficult to get the tokonoma into this room as it was for the last room.

Wednesday, April 13, 2016

Awning to first tatami room, Dragon room, second fusuma


I got the awning installed over the fusuma to the first tatami room. There will be awnings over the entrances to each tatami room in the ryokan. The rooms on the second floor still aren't attached to each other.


These are the walls in the dragon room. I mixed some paint to match for parts of the tokonoma, which will be on the back wall, and for the wall on the left where the fusuma will be.

I also used chiyogami paper on both sides of the fusuma for this room. The green paper in this photo will probably face the second floor landing, and the darker paper below will probably face into the dragon room.


Sorry, this side is blurry, but I'll take a better picture when it's installed.

Tuesday, April 12, 2016

Overview of the house so far


This morning I decided to take a picture of the house as it is now. It's really starting to take shape!

None of the second floor rooms are attached yet, and the changing room to the spa isn't hinged to the house yet, but it gives you an idea of how the house looks up to this point.

I'm starting the second tatami room, which I call the dragon room because of the paper. The dragons are a bit large, but this handmade paper is really gorgeous in person, so I had to use it. I just figure an artist stayed there and papered the wall, then painted big gold dragons on it. :-) In person, it is such beautiful paper that it looks fine in the room. I got the back wall and floor done last night, as well as putting the ceiling on the left tatami room.

I'm also relieved because I found the tiny pieces for a little overhang that goes over the fusuma (sliding doors) to the left tatami room. When I open each chapter, if there are really tiny pieces which might get lost before I get to them, I put them into little zip lock bags. Well, I misplaced the bag of tiny pieces, and was afraid I would have to make pieces to replace them. Anyway, I found them last night, so now I am working on the little overhang, and will probably be able to finish it and put it onto the wall tonight.

There isn't much furniture in there right now because I don't want to break it while I work on the house.

Monday, April 11, 2016

The ground floor stairs are finished


Yesterday I mentioned that every time I adjusted something on these stairs, something else moved out of place. I was so excited to finish these, and I actually got the ceiling adjusted right, then when I looked at the photo just now, I noticed that the stairs aren't lined up right on the floor. I think it happened when I fixed the ceiling. I guess I will just have to figure it out later when the railing is all dry. At least they are in!

Some more accessories


I have finished some more accessories. The first one is a little dressing table with a mirror. (The mirror didn't look so messy until I took a picture with the flash). There is a piece of cloth in the kit to cover it, but I am going to wait until I get some prettier cloth to use on it. I don't know why, but the mirror is supposed to be covered.

The next one is another table, which I will gloss coat to look like lacquer, then a scroll to hang in the tokonoma in the first tatami room.

To the right of that is a tiny wooden telephone, (It's upside down in the photo), to put in a phone booth in the ryokan.

Last is a shoe stone that goes outside the second floor rooms.

Sunday, April 10, 2016

Working on the staircase


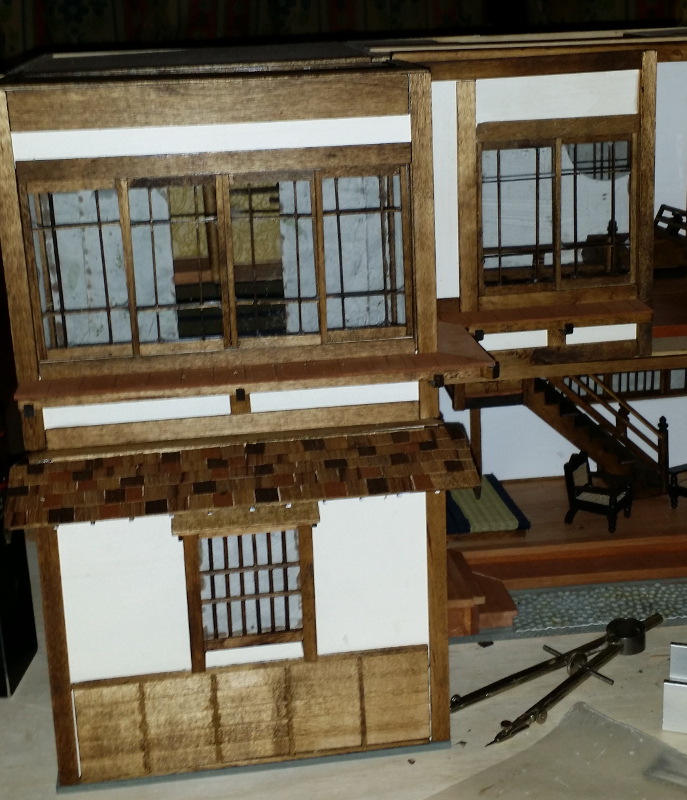
There are some parts of this house that are so much fun I hate to stop working on it, and other parts that are a pain. The staircase is one of those parts that doesn't seem to want to fit right no matter what I do. It's kind of a nice staircase, with interesting landings and things, but getting it to line up exactly right is next to impossible. I am going to leave it this way while it dries, then add another piece of wood to the ceiling so the back post on the landing will attach to that, since every time I tried to adjust one thing, something else went out of whack. (You can see where the back post of the landing doesn't attach right when you enlarge the photo by clicking on it).

I've got two clamps holding the top part until it dries, and a pair of pliers propping up the bottom part of the bannister until that dries. There are two more diagonal layers for the bannister, spaced with little wooden pieces, (you can see the lower one sticking up from the diagonal part that's on there), but I decided not to do any more on it until tomorrow when the glue is good and dry.

I've also been working on some of the accessories when I go up to help out my mother every day. I've got a wooden telephone booth almost done, the little wooden telephone that goes inside it is almost done, and I've been working on a little shoji lantern. The lantern will probably be cute when it's done, but it's horrible to build, because you have to cut some very tiny pieces of wood exactly to fit the paper that wraps around three sides of the tiny wooden frame you make. Then you have to make a little door for it. The pieces of wood are unbelievable tiny. The bells on the wooden phone were hard too, because they are the heads of some tiny brass nails you have to cut off and apply to the phone. Of course the heads of the nails would much rather stick to your fingers than they would to the phone! I also finished a very tiny little dressing table. I'll take pictures of all of that in a day or two, when I've finished the lantern and phone. Oh yeah, I also finished a little "shoe stone" thingy that's kind of interesting. I'll post photos of that later too.

I'm also working on cutting out some leaves that look like palm fronds for a plant. There are a ton of them, and they have a lot of tiny fronds sticking out on each leaf that need to be cut individually. The instructions say to cut them with an X-Acto knife, but I haven't had much luck doing it that way, so I'm using scissors instead. I've been cutting five per day. The photos of the plant completed look really nice, but I am not having fun with those leaves!

Anyway, I'll be glad to get the staircase done, because then I will be able to make and decorate another tatami room! Decorating the rooms is the best part, but the long boring things like shingles and tatami mats add so much to this house that they really are worth doing, even if I get tired of working on them.

Friday, April 8, 2016

First floor overhang shingles, second floor landing


This isn't the best photo, but we had a bad wind and rain storm yesterday, and our power kept going off, so I had a candle going so I could see something every time the lights went out!

I finished the little overhangs over the kitchen and spa and shingled them. The shingles are little sheets of very thin veneer, and they don't have any backing. I was trying to figure out the best way of applying a backing so I could cut the sheets into tiny shingles without them splitting into a million pieces, then I remembered my Xyron. I ran the sheets through that, then marked them off and cut them with scissors. I was hoping the adhesive from the Xyron would hold the stickers to the roof, but unfortunately, the last time I bought a refill I made a mistake and got the repositionable rather than the permanent one. (It's a two hour drive to the store that sells the refills, so I was stuck with it), so anyway, I had to glue them. At least the Xyron stuff made it possible to work with the thin veneeer.

I took all of the veneer shingle material from all of the kits, hoping that the colors were varied a little more from kit to kit, but they were pretty uniform in color. I stained some of them with different amounts of stain to get some variety, and stained and cut all of the veneer at the same time, then put all the shingles into a plastic storage box. That way, I figured all the overhangs on each floor would match. It was a pain working with all of those really tiny shingles, but they looked nice when I finished them.

I also got the back wall and floor done in the second floor entryway. That room isn't attached to the tatami room yet, I don't think it gets attached until the stairs are in. I'm working in those now.


Sunday, April 3, 2016

Finally finished the tokonoma in the first tatami room


As my friend Peggy said in her blog, this was really hard to fit in.

Since I already had a warning that it would be difficult, I kept dry fitting everything to figure out what the easiest order would be to get it in. The other thing that was difficult was that the diagrams for the wooden parts aren't at all to scale, so I had to keep trying the parts I could figure out, until I had everything narrowed down as to which part was which.

I covered the sliding doors to the tiny cabinet in the tokonoma with the same chiyugami paper as I used on the fusuma. The little shelf under the cabinet is a shape representative of clouds.


(This image comes from the book "Japanese Homes and their Surroundings" published in the 1800's).

The border on the tatami on the left is really crooked, so I will probably get some black cloth and redo that one at some point.

I probably won't permanently install the second floor yet, since I plan on electrifying this.

Friday, April 1, 2016

First tatami room progress and first fusuma

When I started this project, I was going to try to make it authentic to around 1900, but I am having too much fun with my decorative paper, which I don't think would have been used back then, so now I guess it is just a Ryokan I am having fun with!


I have gotten more done on the first tatami room. The raised platform is in, but the tokonoma won't be finished until later. I also made my first fusuma, (sliding door to the rest of the ryokan). In the old days, artists used to paint these, so I decided to use some of my nicest origami papers to decorate the doors.


This photo shows the left wall of the second floor landing. This room will be white to match the reception room below it, but will have this patterned mulberry paper instead of the one with leaves that I used downstairs.