How to see all posts

A number of people have found it difficult to see the whole blog. At the bottom of each page, there is a "newer post" and an "older post" link. just click on these to see more posts. There is also a list of pages by month in the left sidebar.
Showing posts with label miniature wiring. Show all posts

Thursday, September 29, 2016

Installed top floor lights, electrified the portico and built battery boxes


Today I installed the lights in the top floor. The two ceiling lights are wired, the little shoji lamp in the irori room is wired, and there is a light in the bathroom. Unfortunately, I still haven't found the other battery connector, so I can't light it up yet. I also just realized that I forgot to put a light in the tokonoma, so maybe it's just as well I didn't hook everything up yet!


I finished the battery boxes today. These are now mounted on the back of the ryokan, one on each floor, so I can keep each floor independent from the others so I can move it more easily.


Here are two lights I made for the portico. The little sticks on the right one were straight. I guess the glue hadn't dried completely, and I must have moved them. I need to fix that tomorrow.


This is the back of the portico. In order to hide the holes where the wires to the lights went through, I glued on two jewelry findings. I was planning on putting the batteries at the bottom and making planters to hide the batteries in, but luckily before I did that, I remembered that the doors slide open, and I couldn't block the bottom with planters. Anyway, I made battery boxes above the doors instead. I left the wire and switch peaking out of the left hand side so you could see how they work. I will paint over the little bit of wire that is visible above the jewelry findings to camouflage it.


This is the house closed and lit. I only wish I could light the top floor!

The ryokan has essentially been finished for a while now, with the exception of the last two tiny armrests for the legless chairs, and permanently attaching the roof on the portico. The only parts of the kits I don't plan on making are the 50's style TV sets, and the 50's style overstuffed chairs. I guess I'm just not a 50's girl, even though I was born in 1952!

Anyway, today I finished the last two armrests, and installed the portico roof permanently. Before, I had just set it on top without gluing it because I knew I would be moving it around a lot, and it would be easier to work on without that heavy roof attached. The kit had a large slab of black modeling clay that you are supposed to spread out and push down into the wooden framework below the tiles. This gives you more surface area to attach the roof, and it doesn't show from underneath.

I also strengthened the bottom posts of the portico, since they seemed to like to come loose with a lot of moving. The kit gave you two little wire things to push up through the bottom and into the bottom of the posts. I enlarged the holes and glued cut off toothpicks in to hold them more firmly to the base, and it's much sturdier now.

Tomorrow I will put a light into the last tokonoma, and make more accessories. I will need to start getting some landscaping soon!

Wednesday, September 28, 2016

Got the second floor rewired, and worked on the lighting agan

Today I finished rewiring the second floor, so the ryokan is back together again except for the parts of the stairs that have to be removed every time I take it apart. I also made another light for the top floor, put a nano chip into the crooked little floor lamp I built last winter, started making lamps to go on either side of the portico, and started making battery boxes to go on the back of the ryokan.


This is a closeup of the lamp I made for the kitchen.


This is the one in the reception room.


Here is the one in the spa.


This is the a photo of all the lights lit, and the photo below is a closeup of the two floors that are wired. I definitely need to tone down the light in the phonebooth, but that will be easy. All you need to do with LEDs is to paint them with a little acrylic paint! I love the fact that they don't get hot, so they can be used anywhere.

I still haven't found the battery connector thing for the third floor lights though. :-(

Tuesday, September 27, 2016

More electricity, and I made more lamps

Today was a funny day. It has been cold here for about a week, and today was a dark and damp day, so it was really quiet. Most of the day, I worked on electrifying lamps and making more. It's funny, because I have been planning on using my die cutting machine to make some lamps, and today I actually made some that way. When I got home and was ready to do another blog post, I saw a comment from my online mini friend Jodi, suggesting that I use the die cutter to make lamps. I guess great minds think alike!

Anyway, it was so slow today, that I took all the levels apart on the ryokan, so I could wire the bottom floor. The roof was just sitting on top of a table in the shop, and the other two floors were on the floor of the shop. I got the bottom floor all done, then decided to rewire the middle floor, because I had forgotten to hook the telephone booth light into the middle floor wiring. By the time I started this, we started getting all kinds of company and customers, and my shop was a mess of ryokan parts!!! :-0

Anyway, we were there late, so I didn't get a good photo of the lights I made today. I'll try to take some better photos tomorrow!


This is the little fake stone lantern I made a while ago from the kit. One of the great things about those Pico LED Nano Chip lights is that they are so tiny I could put the little chips in through the tiny holes in the lantern!

This lantern will be out in the garden, so I added some fake moss to it. I will play with the moss again tomorrow when it has had time to dry, and try to make it more realistic. The outside lights are each wired into their own 3 volt coin cell thingy. I figured if I kept them separate, I could arrange them any way I want when I get around to landscaping.


This is the bottom floor all wired. The rest of the floors are all sitting around the shop waiting to be put back together. These are the three lights I made today. For the one in the kitchen, I drew a triangle shaped piece with a flat top, and copied it four times with heavy metallic copper card stock, and four times with rice paper for the lining. There are holes cut into the copper paper so the light shines through.

For the other two lights, I used a couple of my dies for card making and my die cutter, then lined them with rice paper. I was trying to make something besides shoji style lamps. They do look like copper in real life, and are very sturdy. I'll try to take better photos tomorrow. Hopefully, I will also get the middle floor rewired,

I'm sort of bummed out. I can't find the 9 volt battery holder thingy for the third floor, so I won't be able to light that floor until I either find my other one, or send for a new one. Sometimes I swear there are little gremlins who sneak in and make things disappear!!!

Oh yeah, the little Van Brode Mexican man is holding down the fort for the owner, while he goes out to get supplies!

Monday, September 26, 2016

Got the lighting, and lit part of the house up today!


Today I got my lighting stuff from http://www.modeltrainsoftware.com/lightsforminis.html . I got reels of positive and negative wire and 5 3-volt nano chip lights in the pico, or tiniest size, (This size is great for our minis, it lights up a lot more than you would expect, even though you can barely see the tiny chip)! I got those 5 chips as kits containing the battery holder, switch and a coin battery. I also got two more room lighting kits, (1.8 mm LEDs), shrink tubing, 5 9-volt and 5 3-volt pico nano chips without the whole kit, 3 sizes of fiber optics, and 5 9-volt and 5 3-volt 1.8 mm LEDs.

I'm glad that I got such a wonderful variety of sizes and voltages, because I am finding a use for all of them.


I made this light for outside the portico. It is quite tall, and the pico nano chip lights it up really well. The paper looks a little wonky, but I wanted to leave two sides so I could remove them in case I ever need to access the lighting.


I can't believe I forgot to turn off the flash on my camera's phone when I took this picture, but you can still see the middle floor lit up. It was pretty exciting, because this is my first attempt to electrify a house!

Darn, just now I noticed that I forgot to hook up the light in the phone booth!!! That stinks, because it means I will have to hook it up to a separate battery.

I put those little Van Brode figures that I bought yesterday in, just so I could judge sizes for when I want to get dolls for the house. As I figured, these are too tiny, but I left them in because they were having such a good time having an international festival in the ryokan! :-D

Thursday, September 8, 2016

Electrifying the ryokan and more

I am finally back to working on the ryokan and posting. It has been really busy with company, a trip to see the grandchildren, and a mini vacation at a sporting lodge in the Maine woods.


This photo shows some cushions I have been making for the chairs, and a couple of arm rests. The cloth on the cushions is quite thick to use for chairs this tiny, but in person it looks quite nice. The photos don't do it justice, because they reflect too much light. I've still got lots more cushions to make, and quite a few arm rests.


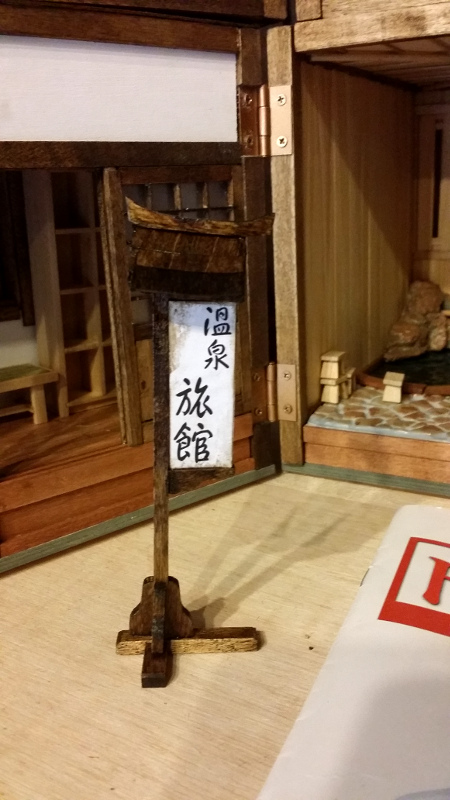
This is a little sign that goes outside of the ryokan. I grunged it up a bit so it would look more like it's been outdoors in the weather.


I finally started making the hanging lamps to go in the ryokan. I modified them so I could add battery powered LED lights. It makes the cords they are hanging from look heavy, but I think I am going to like them. There is also a plain LED bulb inside the tokonoma. You can't see it, but I think it will look nice when it's lit. I bought a little kit from miniatures.com, that contains five lights. I knew I would need more, but thought I would buy the tiny kit first, to see how I like them. They were very easy to wire, so I am going to order more.

I haven't added the battery part yet, because I haven't decided how many lights I want, and where I will want them, plus, the wires won't reach all the way across the middle floor, which is the floor I wired first so I need to figure something out. (I am keeping the ryokan so the floors aren't permanently attached to each other, so it will be easier to move, which also means that each floor will be wired separately). Anyway, it will be fun to see them lit! I will probably have to add paint to each bulb to dim them down some, but I won't know how much they need to be dimmed until I light them.

The little buddha in the tokonoma was in my stash of things that I've had for years. I've had it for so long that I don't even remember where it came from. Anyway, he looks quite contented sitting in the tokonoma for now.


I put a bare bulb in the telephone booth, but I'm not sure if I will add any more lighting to this room or not. I will probably put a bulb into the little shoji lantern as well, but I still haven't decided which room to put that into either, which is part of the reason I haven't hooked everything up to the battery part of the kit yet. Part of the staircase is missing in this room right now because I've got the floors separated while I add the wiring.


This is the light in the dragon room. I put a bare bulb in the tokonoma of this room as well.