How to see all posts

A number of people have found it difficult to see the whole blog. At the bottom of each page, there is a "newer post" and an "older post" link. just click on these to see more posts. There is also a list of pages by month in the left sidebar.

Monday, June 27, 2016

Decorating the tops of the roof


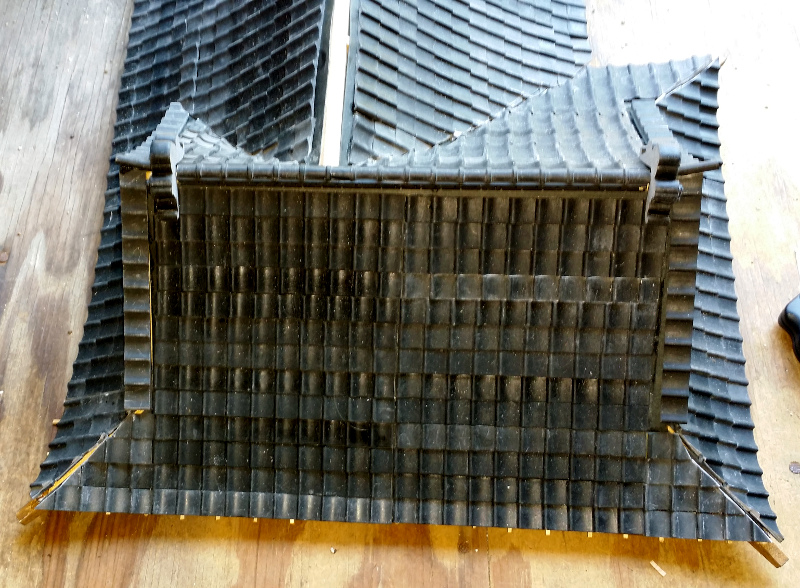
Today I finished up most of the tiling, and put the half round tiles on the top of one of the gables. It was a bit confusing, and translation software seems to be quite useless for the instructions.

For the tops of the gables, there was a decent photo, so I could figure out how to do it. You had to alternately layer three thin strips of notched wood, and one plain strip, cut them to the right length, and place them on top of the gable. Then you glued the half round tiles on top of that.

It wasn't clear how many layers of the wood strips were under the tiles going down from the onigawaras. (They separate the regular tiles from the tiles placed vertically down the gables). From the photos in the instructions, it looked like they only used one, but there were just enough of them to do two notched layers and one plain layer. Anyway, I decided to wait until I got home so I could look at Peggy's blog and see if I could figure it out from her photos.

Peggy had great photos, so tomorrow I will be able to work on those. Thanks Peggy!!!

The roof is now coming along quickly, and I am hoping that the regular roof tiles are straight enough so I won't have a lot of work to do trying to make them look right with the tops of the roof and gables.

Friday, June 24, 2016

Lots done on the roof


I've been working on the ryokan a lot, but have been too busy to find time to post. These two photos show what it looks like as of now. (The inside stairs still aren't permanently installed).

I will have to do some patching to hide the white lines under the two gables. There have been a few things it has been impossible for me to figure out, even with translation software, so I just have to try to do the best I can, and will fix whatever didn't come out just right after the roof is done. So far, anything that is a little "off" will be easy to disguise later on.

I have almost all of the tiling done, which is a relief, because there is a lot of fitting and cutting to do, and the tiles are really tough to cut, but the roof will be so beautiful that it's worth it!

I've got the fancy wooden things done on the front two gables, as well as the onigawaras on both of them. (The onigawaras are those two decorative tile things sticking up over the peaks). That really added a lot of interest to the building, and I was excited to get them done.

There is still quite a bit of tiling to do on the back of the roof, then more fancy stuff on the peaks and the angles of the roof. I will probably give it a coat of black paint once it's done, because the tiles aren't very even in color. Peggy had to do that with hers as well. Once that is done, I will be able to finish all the lights and accessories I didn't do before. Then I will be able to start things like the landscaping and extra accessories which aren't part of the kit.

Since the house is on display now, it's good to have it looking as complete as it does!

Friday, June 17, 2016

More Tiling on the Roof

Yesterday I brought the ryokan roof up to the gift shop. I had been working on it at home, and working on a dollhouse for my granddaughter while at work.


The top photo was taken this morning. It was the first time I have had the roof on the house. (I should have made sure the extensions were all the way closed before I took the photo though).


I took this photo just before I came home tonight. I am trying so hard to do a good job cutting and laying these tiles, but they just aren't coming out as good as I would like them to be. I'm hoping filling in gaps with black Fimo isn't going to be in my future, but I'm afraid it will be. At the moment, I am using an X-Acto saw to cut the tiles. The first blade is getting pretty dull, so I may have to send for a few new blades. I think the roof is going to take a very long time, since there will be so much cutting and fitting!

Friday, June 10, 2016

More little decorative sticks, more black paper, and finally a few tiles!


First, excuse the gluey fingerprints on the black paper. It's not going to show, so I'm not concerned about it. I was more worried about making sure the paper stuck to the framework firmly, than whether or not I left fingerprints.

I'm not doing everything quite in order. As I stated in a previous post, I am adding the decorative little sticks to the underside of the eaves first so I can clamp them. Peggy mentioned the clamping problem once the paper was installed on her blog, so I decided I would take heed, and put mine on before the paper.

I am going to do the tiling in the order it is in the instructions, but I am alternating little sticks, paper, and tiles just so it won't be so repetitive. The first set of tiles goes on the end of the roof, so tonight I added the little sticks and the paper to that section, and had time to add the first two rows of tiles.

Adding the tiles was pretty exciting, because it will start to give the roof that traditional Japanese look. I do know that this is the easy part of tiling. Later on, I will have to cut them to fit the "mountains" and "valleys", and that there will be a lot of angles to cut correctly.

The tiles are in strips, 5 or 6 inches long, and are tapered from the top to the bottom. They are made of a very hard material, which may be resin. Some are shinier than others, and I know that Peggy painted hers to make them more uniform in color, so I will probably do that with mine as well.

I haven't trimmed the ends of the little decorative sticks, or painted the tips white yet, I will do that when they are all installed. For those, I had to take longer strips of wood and cut them into 54mm long pieces. Peggy recommended cutting them to 55mm instead of 54, so I did that with mine. After all you can always shorten the ones that are too long, but you can't make the short ones longer! I have a tool called the Chopper II, that looks like a paper cutter. It has a little thing you can clamp on to cut a bunch of small sticks to the same length easily. It came in very handy!

There are little lanterns that hang from the roof outside the ryokan in these chapters, but I will probably wait to make those. I really want to get the roof finished, since the roofless ryokan is on display in my shop.

More sticks, paper and tiling tomorrow!

Thursday, June 9, 2016

More roof work


I'm glad I read Peggy's blog, and am doing this out of order. I added a lot of the little trim sticks under the eaves, then started putting on the heavy black paper that will be under the tiles. It was so easy to clamp any sticks that needed it this way. Tomorrow, it will be more sticks before I paper some more.

Once I get sticks and paper on the two ends of the house, I will be able to try a few tiles. I understand those aren't easy, but I am really anxious to see how they look!

Sunday, June 5, 2016

Still working on the roof

Since starting my granddaughter's house, the progress on the ryokan has slowed down so much. I can't wait to get back to working on it full time!

Here's what I have been doing lately. It looks a lot like the last photo, but I had to cut very thin sheets of wood to size and mount them to the outside framework. They will be under the eaves of the roof.


Before attaching them, I had to make sure all the framework was very even, and sand anything that wasn't. It was a very long process.

Now, I am staining some parts of the framework that will show even when the tiles are on. The next step after I attach those is supposed to be cutting and fitting some heavy black paper to the framework, which will support the tiles. Then, there will be little sticks to cut and fit under the eaves. These will be like the ones on the porch overhangs. I will probably install all of those before I do the paper though, because Peggy found it difficult to clamp them on her house once the paper was on.

Thursday, June 2, 2016

Still working on the roof

We were gone over the long weekend, so I didn't get a chance to work on the ryokan for a few days. I'm still working on the roof, trying to get all the framework straight, and get some very thin sheets of wood under the eaves. It involves a lot of sanding and fitting, and is a real pain. I'll post pictures soon.

I've had a lot of people come to the gift shop to see the rest of the house, and everyone loves it. Today, a lady from Japan came in, and we had so much fun looking at it. She taught me how to pronounce "ryokan" correctly, and taught me so many things. I was so glad she came in! She was very surprised to come to a tiny island in Maine and see a traditional Japanese miniature ryokan in a building that used to be a clam factory!

Anyway, I've had a lot of busy days. I'll post new photos soon!